Using React Native Admob to Include Ads
I can be awkward including ads into your react-native app for the first time. Using react-native-admob can make this a simple process, but there are some difficulties that come with it. We will go over the process, and how you can test your ads.
Installing React Native Admob
To get started, first install the npm package:
$ yarn add react-native-admob@nextNext add the required pod files:
pod 'react-native-admob', path: '../node_modules/react-native-admob/
pod 'Google-Mobile-Ads-SDK'
Now install and update the new pods:
$ cd ios; pod install --repo-update; cd -React Native Admob Setup
Before anything else, create an admob account or log into your existing account. Once in your Admob account, create a new app from the app list.
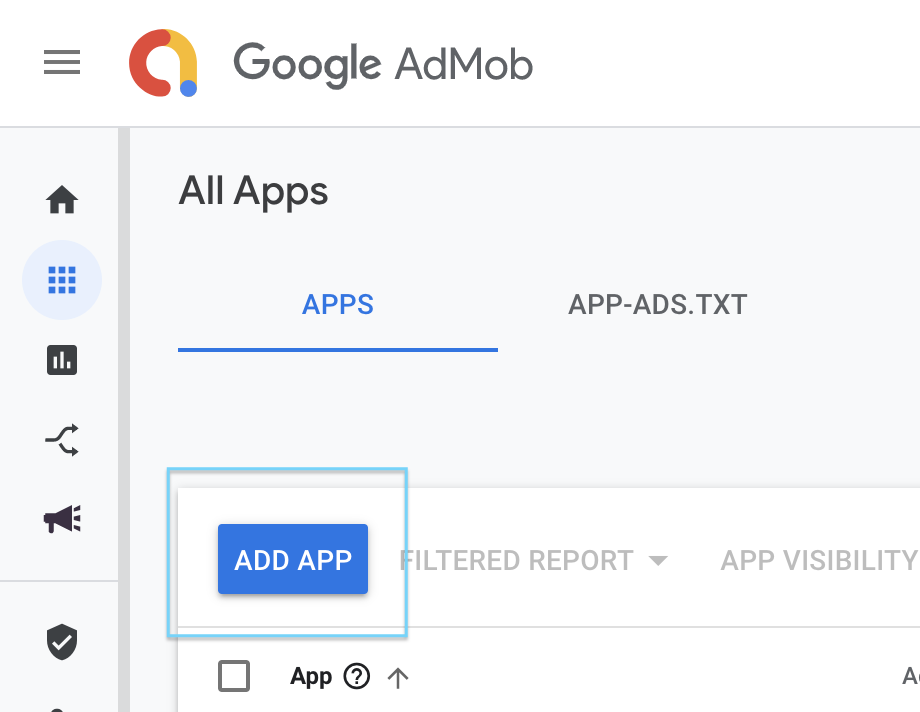
Once your app has been created in Admob, make note of the app key associated with it. We will need to add that to our app before we can add any ads to our app.
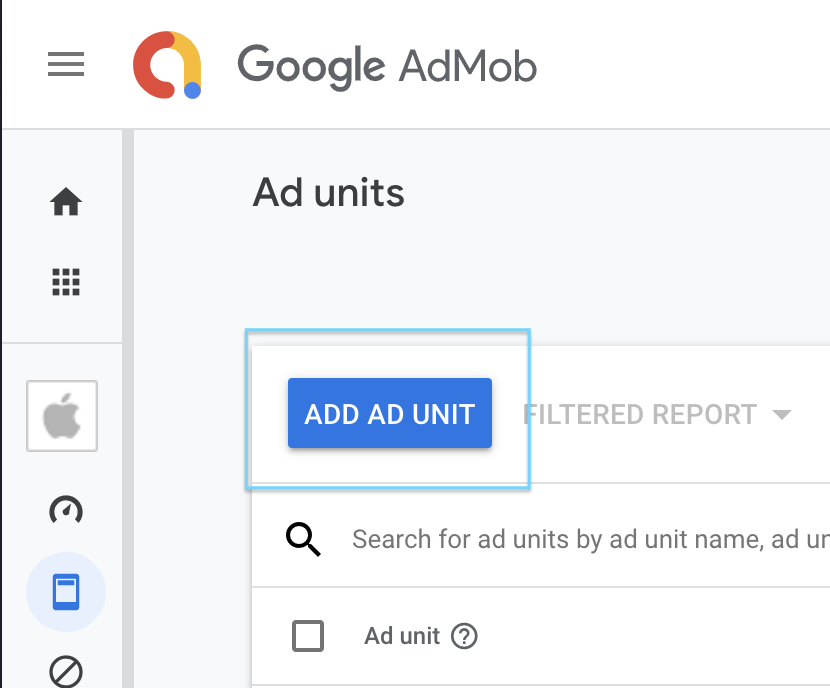
Now select your new App, and go to the Ad Units section. In this section click the Add Ad Unit button, and choose to create a banner ad. Name your unit, and make a note of the key when created.
Adding React Native Admob
To link the app we made in Admob into our iOS app, we need to add the app key to our Info.plist file (ios/projectname/Info.plist). This can be done manually, or added within XCode.
Manually adding to Info.plist
You want to add your new app key to the dictionary at the top of the file. You are adding the key GADApplicationIdentifier, with a value holding your admob key.
<?xml version="1.0" encoding="UTF-8"?>
<!DOCTYPE plist PUBLIC "-//Apple//DTD PLIST 1.0//EN" "http://www.apple.com/DTDs/PropertyList-1.0.dtd">
<plist version="1.0">
<dict>
	<key>CFBundleDevelopmentRegion</key>
	<string>en</string>
	<key>CFBundleDisplayName</key>
	<string>$(PRODUCT_NAME)</string>
	<key>CFBundleExecutable</key>
	<string>$(EXECUTABLE_NAME)</string>
	<key>CFBundleIdentifier</key>
	<string>$(PRODUCT_BUNDLE_IDENTIFIER)</string>
	<key>GADApplicationIdentifier</key>
	<string>ca-app-pub-xxxxxxxxxxxxxxxx~xxxxxxxxxx</string>
    ...
Adding In XCode
With your projects xcodeproj file (ios/project.xcodeproj) open in Xcode, select the Main target in the App project profile. Then go to the Info options, and expand the Custom iOS Target Properties. In this section hover over another key, clicking the + next to its key. In the new row, add GADApplicationIdentifier in the Key column, set the type as String and then add the Admob key in the Value column.
Adding to your AndroidManifest.xml
Open the AndroidManifest.xml file found in the android/src/main folder. In this file you want to add a new key to your application. The key name is com.google.android.gms.ads.APPLICATION_ID and the value is your Admob App key. We use a meta-data tag to do this, which you can see below:
<manifest xmlns:android="http://schemas.android.com/apk/res/android"
  package="com.kanapractice">

    <uses-permission android:name="android.permission.INTERNET" />

    <application
      android:name=".MainApplication"
      android:label="@string/app_name"
      android:icon="@mipmap/ic_launcher"
      android:roundIcon="@mipmap/ic_launcher_round"
      android:allowBackup="false"
      android:theme="@style/AppTheme">
      <meta-data
        android:name="com.google.android.gms.ads.APPLICATION_ID"
        android:value="ca-app-pub-xxxxxxxxxxxxxxx~xxxxxxxxxx" />
Adding a Banner Ad to React Native
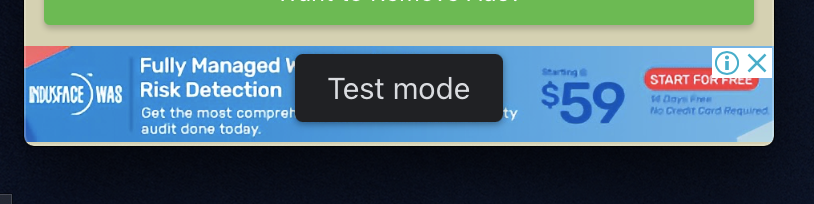
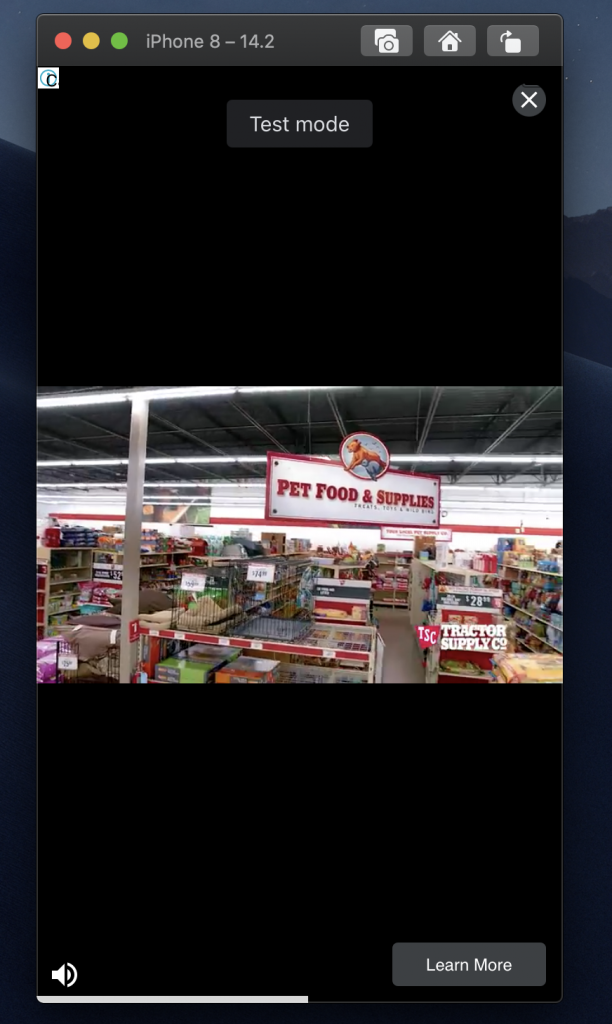
To add the banner we created earlier, all we need to do is add the banner to our code. I like to use a component for my banners, which shows when ads are enabled. It also sets the size of the banner based on the orientation output from the Dimension module. When using our ads in an environment outside of the AppStore or Play Store, we need to set a test device.
import React from 'react'
import { AdMobBanner } from 'react-native-admob'

const AdBanner = ({ isAdEnabled, screen }) => (
  <>
    {isAdEnabled ?
      <View style={styles.ad}>
        <AdMobBanner
          adSize={screen.orientation ? 'smartBannerPortrait' : 'smartBannerLandscape'}
          adUnitID="ca-app-pub-xxxxxxxxxxxxxxx/xxxxxxxxxx"
          testDevices={[__DEV__ ? AdMobBanner.simulatorId : null]}
          onAdFailedToLoad={error => error}
        />
      </View>
    : null}
  </>
)
Adding this module to our view will give us a test ad, similar to what we would see in production.
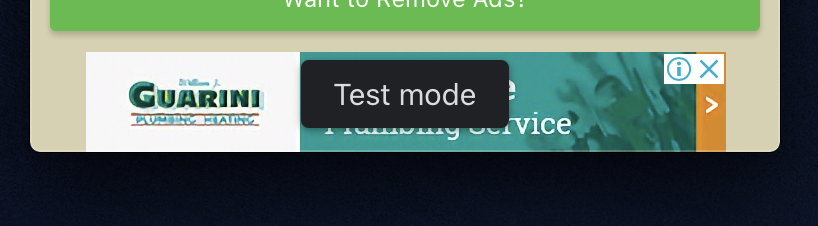
You may notice that the banner ad doesn’t fit the width of the screen. That’s not our component, that’s Admob. To be more exact, this is from the creator of the banner itself. You’ll notice as ads cycle, that many will fit.
Adding an Admob Interstitial Ad
If you have ever played a mobile game, you have surely seen an ad cover the entire screen at one point. Sometimes these ads give you the option to close within a 5 second time period. These types of ads are interstitial ads, which we can add using React Native Admob.
Unlike banner ads, we need to load our ad before showing it. Once loaded, we can request to show it at any given point. If we try to show our ad before it’s ready, we will run into issues. We can keep this from happening if we only show when the ad is loaded.
Here is a basic class component which will load the ad on mount, and offer a method to our leaf components to show this ad. We also offer another method to request a new ad, incase the component doesn’t unmount.
import { AdMobInterstitial } from 'react-native-admob'

AdMobInterstitial.setAdUnitID('ca-app-pub-xxxxxxxxxxxxxxx/xxxxxxxxxx')
AdMobInterstitial.setTestDevices([AdMobInterstitial.simulatorId])

export default class AdView extends Component {
  constructor(props: Props) {
    super(props)

    this.state = {
      isAdLoaded: false,
      isAdShown: false,
      isFinished: false
    }
  }

componentDidMount() {
    AdMobInterstitial.addEventListener('adLoaded', () => this.setState({ isAdLoaded: true }))
    AdMobInterstitial.addEventListener('adFailedToLoad', () => console.log('ad load failed'))
    AdMobInterstitial.addEventListener('adFailedToOpen', () => console.log('ad open failed'))
    AdMobInterstitial.addEventListener('adClosed', () => this.requestAd())
    AdMobInterstitial.addEventListener('adOpened', () => this.requestAd())
    AdMobInterstitial.addEventListener('adLeftApplication', () => console.log('ad left'))

      AdMobInterstitial.requestAd()
  }

  componentDidUpdate(prevProps, prevState) {
    const { isFinished } = this.state

    if (!prevState.isFinished && isFinished) {
      this.showAd()
    }
  }

  componentWillUnmount() {
    AdMobInterstitial.removeAllListeners()
  }

  requestAd = () =>
    AdMobInterstitial.requestAd()
      .then(_out => this.setState({ isAdLoaded: true }))
      .catch(_error => this.setState({ isAdLoaded: false }))

  showAd = () => AdMobInterstitial.showAd()
    .then(_out => this.setState({ isAdShown: true }))
    .catch(error => {
      this.setState({ isAdLoaded: false, isAdShown: false })
      console.log(`ShowAd: ${error}`)
    })

  finishGame = () => this.setState({ isFinished: true })
}
In the case of showing an ad after a certain event ends, we use the componentDidUpdate lifecycle event. When your app’s content or game finishes, you run your cleanup method (e.g. finishGame). In that method we update the isFinished state, which will triggers the ad.
Reward Ads
When you want to reward your users when they watch 30 seconds of a full-screen ad, you want a reward ad.
Troubleshooting Ads
If you are new to Admob, at some point you will have issues with your ads. Let’s go over the most common cases.
Admob Unit Test IDs
When you create a new Ad Unit, it can take a few hours for ads to show. In the meantime you can use Google’s Test IDs as the unitID for your ads. Look up the test ID, and use it with the associated Ad when testing.
Admob Ads Missing in the Simulator
When your ads refuse to show in the Simulator, we know it’s an issue with the component, or your Admob account.
In your App:
- Make sure you have a test device set in the testDevices prop
- Double check that the component is in the view
- check for any errors coming from the component
In your Admob Account:
- Agree to the required policies
- Check notifications for any new changes
- Review the ad unit and make sure it’s enabled
Admob Ads Fail to Show on Test Devices
If ads are showing in the simulator, but aren’t showing on an actual test device (i.e. Test Flight, Manual Distribution), make sure to identify it. In your Admob account, go into the app settings. In there you can set your Test Devices. To set a device, you need to provide the IDFA (Identifier for Advertisers). Depending on the OS, you can find this ID is different places.
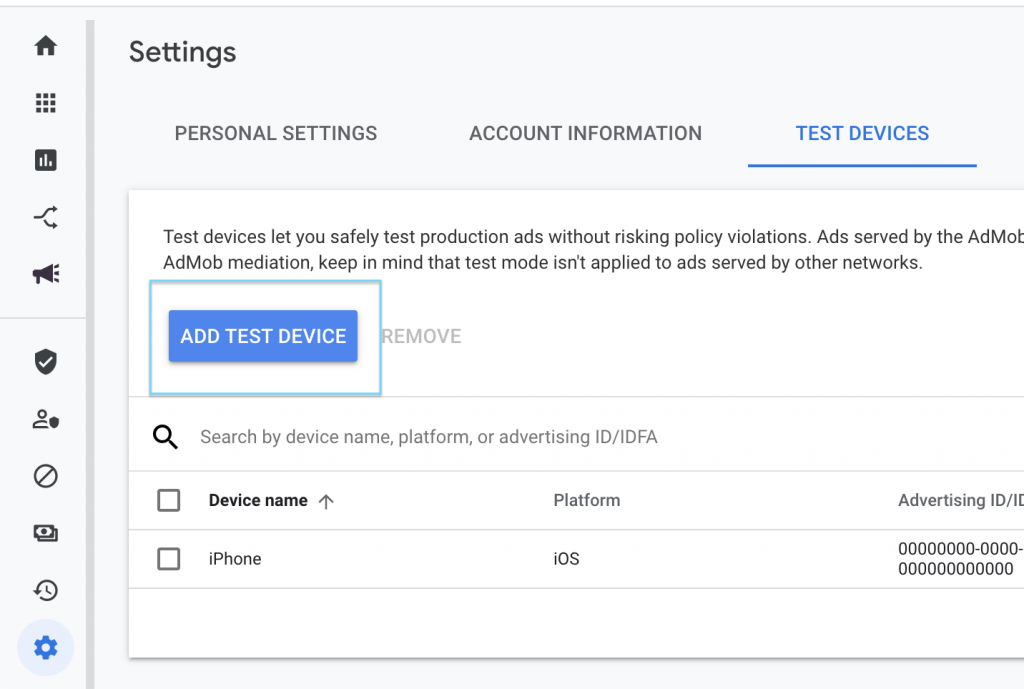
iOS:
Apple does not expose the IDFA publicly, so you will need to use Apple’s AdSupport class object manually, or use a 3rd party app. The app My Device ID (by AppFlyer) works well.
Android:
The IDFA is much easier to find in Android OS. Go to Google Settings app, and choose Ads. You can find your IDFA on the lower half of the screen.
Other Ad Issues
If you continue to experience issues with your Ads showing, be sure to check this List of Causes from Admob Support.
No Comments