Testing IAP On iOS
In App Purchases is a great way to generate income in your apps, and when working with payments it is incredibly important that you test them extensively. When working with iOS, the way your IAP work and respond can keep your app build from being accepted for release. Let’s look at how to setup a development test environment for iOS apps, and the method for testing IAP in development and production.
Quick In-App Purchase Composition Overview
The app using IAP will check for existing transactions, so we can verify each transaction. Because we want to make sure a successful purchase exists when enabling a paid feature, we verify the transaction each time a new screen or card is rendered. This way we make sure to not only handle purchases, but also refunds and failures.
In regards to the app’s UI/UX, there are a couple details worth mentioning. Since transactions can sometimes be slow, our purchase button provides feedback when the transaction is processing. Our purchase page will visually changes when the purchase is successful. Lastly we provide a clear error message for failed or cancelled purchases.
Settings Up StoreKit for Testing IAP
To test In-App Purchases in development using a Simulator in XCode we need to create a StoreKit environment. This allows us to test in Xcode before testing IAP on a real device. To do this, we first need to create a StoreKit configuration. We can do this by adding a New File in the Project Navigator. Since the file needs to be in the root of our project folder, right-click our project folder, and select New File. In the dialog to choose a file type, go to the Other group, and select StoreKit Configuration File.
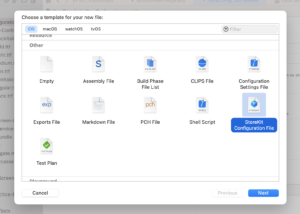
Next name the file StoreConfiguration.storekit, and select to add it to your App’s main build target.
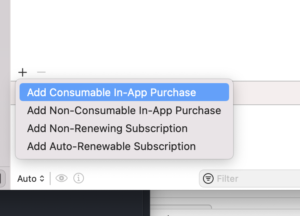
After creating your StoreKit Configuration file, we can select it in the Project Navigator. When selected we’ll see a unique screen in the preview showing our mock store. On the left side we see our In-App Purchases, and being a new file is empty. Clicking the + at the bottom-left corner allows us to add new purchasable items. So, let’s create a new Consumable item.
To create a new item we need to provide a Reference Name, Product ID, and a Price. The Reference Name can be anything we want it to be, but the Product ID needs to match the Product ID used in our App for this purchase, as well as the item in App Store Connect. In this example I’m using a consumable product called “removeAd” which disables Ads in the app.

With our consumable item created, we are ready to test that purchase in our app.
Testing IAP in Development
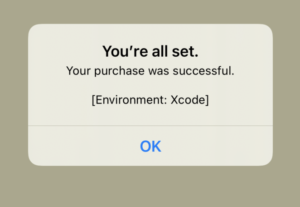
In the App example, I have a single screen that offers the ability to purchase the “removeAd” consumable, as well as an option to “Restore Purchases”. Both buttons are disabled when a transaction is successful. We have dynamic text which changes depending on the ad presence. When the purchase is verified, this text tells the user that ads have been disabled and that the features have been unlocked. Let’s go ahead and test this right away. By requesting to purchase the item, we should see a purchase confirmation from Xcode. When we confirm the purchase, Xcode will return a successful transaction response and also show a message that the transaction was successful.
If for some reason your test failed, we would know there is an issue somewhere with the purchase, transaction, or transaction verification. So, let’s look at how to verify Xcode transactions.
Debugging Transactions
With Xcode as our test store we need to know how to manually check and remove transactions. If we go to Xcode’s Debug menu, we’ll see a StoreKit group at the bottom, and in that group an option to Manage Transactions. This section gives us the list of the transactions handled by Xcode.

After testing IAP purchases, we should see a successful purchase transaction for our consumable. If you tested the purchase but don’t see a transaction, there is most likely an issue with the purchase logic.
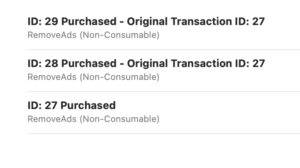
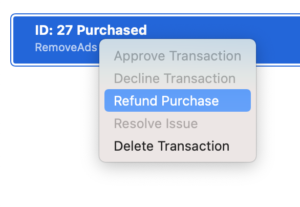
As mentioned before, the system checks the transaction on each screen change, to make sure nothing has changed. So when we have successful purchase, we will start seeing these verifications in our transaction history. You can see this in the screenshot below, where transaction 28 and transaction 29 were verifications that 27 exists.
Testing IAP Refunds
We can refund the purchase by right-clicking our transaction, and selecting Refund Purchase. Once we refund the transaction, our app will stop getting a report of a successful transaction.
Once our transaction verification is triggered again, the app should go back to the previous setup, and allow the user to purchase the product again.
Testing IAP Cancellations
With our previous transaction refunded, we can test for failures. Go through the process of purchasing the product, but instead of confirming the purchase, cancel it. You shouldn’t see a visual error here, but your app should receive the error code “E_USER_CANCELLED” when this happens. Depending on the situation, this may be a good place to insert a random CTA, but most importantly it shouldn’t cause an error.
Test IAP Interrupts
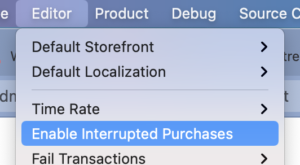
People often run into purchase issues due to their payment method, and we can simulate this with interrupted purchases. Since this area can be tricky, its the one use-case you want to make sure is absolutely solid. Testing these in Xcode is really easy, and see what happens. We First go to Xcode’s Editor menu and select Enable Interrupted Purchases. Now we can test interrupted purchases. When this happens Xcode will return the error “E_UNKNOWN”.
Testing in the Sandbox for Production
When it’s time to test for Production, the sandbox environment allows us to simulate the production environment. We can use a sandbox user to test our app on real devices. We can add users from the App Store Connect. Next go to the Users and Access section, and choose Testers in the Sandbox section at the bottom of the left menu. Then click the blue + next to the Sandbox Users heading, and then enter the required information for that user.
Once we have a sandbox user created, we can use that user when testing our app on a real device. If we install our app using development distributions (TestFlight, manual IPA install), we can use the sandbox user’s credentials when testing purchases. When making purchases with these users, we’ll see a payment confirmation from a sandbox environment.
Managing Sandbox Transactions
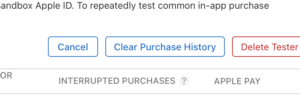
Since we lose the ability to debug transactions in the sandbox, we have to handle transactions a bit differently. After making a successful purchase using a sandbox user, that user will continuously show a successful transaction to your app. To remove the purchase, we need to go back to the sandbox user list in App Store Connect, and click the Edit button. When Editing, select the user you want to remove the purchase from, and click the Clear Purchase History button. Now you can test purchases again with that user.
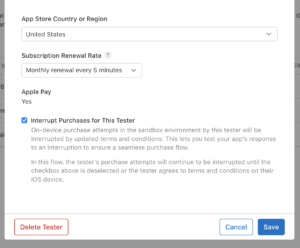
When it comes to purchase interrupts, we go back to the sandbox users list again. This time we only need to click our sandbox user, which will open a new dialog. In this dialog we have an option we can select to interrupt the user’s purchases. If we select this option our user’s purchases will be interrupted.
Changing Sandbox Users on a Device
There can be times when using multiple sandbox users can be beneficial. The problem is once you login to a sandbox account, you don’t see the login dialog again. So how do you change the sandbox user? This option has moved around over time, but in iOS 14+ you can find it in Settings > App Store > Sandbox Account. From this you can switch between different sandbox users when using your app to test.
Preparing for Release
If testing IAP in Development and the Sandbox environment was successful, this part of your app is ready to release. Just to recap, you should have confirmed all of following and each worked as expected in each environment:
- Purchases are Successful and Enable Features
- Refunds Revert Back to Purchasable
- Payment Interrupts are Handled
- Payment Failures are Handled
If all is good, congratulations! 🎉
I hope this article has been helpful, and please comment below if you have any questions. Happy coding!
No Comments