
The Perfect PHP Environment Setup
Since I recently moved back into PHP, I have found that with the new OOP structure called for a little bit more than what my usual ViM editor could do. After working a lot with 3D in the past year, my main system is a Windows 7 custom built system, so needless to say, setting up a WAMP was not an ideal option. Instead I have created a LAMP VM guest on the system, paired with NetBeans to get everything I could possibly need for my PHP work. In this article I will go through the entire setup, and how to get around those pesky issues that arise when setting up some of the necessities.
The layout is simple, and I have found that more and more people have been looking for a similar solution, but have so much trouble getting everything to work. This allows Windows users to develop on Windows without having to go through all of the hack jobs needed for a WAMP setup, and not have to litter your Windows system with lots of litter just to accomplish the same thing. This article covers Remote File Sharing between the systems, ability to use Remote Xdebug from Netbeans, run PHP 5 & Composer on Windows, and of course sync the project with GitHub, as well as keeping your project synced. I have also added an Xdebug troubleshooting section, so that you can get Xdebug running flawlessly.
Surely I’m not the only one that would find this to be be the Perfect Setup.
Now, I will try to keep this brief, because this is a lot of information to take in at once, but can be used to setup your own environment in a similar way.
Host System: Windows 7 with NetBeans 8.0.2
Guest System: VMWare Player with CentOS 7 Network Type: NAT
Host IP: 192.168.1.130
Guest IP: 192.168.200.151
Now I will not go over how to install the OS on to VMWare, as many user may prefer another Linux distro, or even another OS entirely, but that information can be found all over the place, including how to install the latest greatest PHP on the guest. I will start this with the understanding that both Operating Systems are installed, Apache & PHP on the guest, the ability to view the php folder through Apache, and with NetBeans installed on the Host System.
Now that we have that out of the way, let’s start getting into how to get everything setup correctly.
Remote File Sharing Setup
Most likely we want to be able to share file with the guest system, and not have to do much to accomplish this. This can be done with NetBeans built-in SFTP file sharing. Before we start that, we need to make sure that the project folder is setup for us to upload, and execute without any issue. Doing this consists of giving the permissions to the folder needed with the command:
> chown -R username:apache /var/www/html/myprojectKeep in mind in Debian based systems, the Apache group may be www or www-data, so make sure to change it accordingly. We want to be able to write to it ourselves, but at the same time give apache access to read and execute.
Now, from your NetBeans project, go to the Project Properties. In the properties we need to go to the Run Configuration, and set the Project URL to the site address we use to access the folder we have setup in Apache. Next click the Manage button next to Remote Connection, and add the same information you would use to SSH into the guest system. This should be your basic username/password used to log into the guest. The set theInitial Directory to /var/www/html. Click Ok, and back on the Run Configuration set theUpload Directory to /myproject . Last set the Upload Files setting to On Save. This allows us to upload changes after we save each file, and in turn have the ability to check changes on the fly.
Xdebug Setup
Now to setup Xdebug. This is probably one of the most frustrating things to setup, but with this guide it should go without a hitch. First off, make sure your guest VM network settings are set to NAT. Using the other types can cause a lot of issues, but is not impossible to setup. If you prefer another network type, get it working in NAT first, and then work from there to get it working in a different type.
First, install Xdebug onto the guest system. Most distros offer this as a package as php-xdebug, php-pecl-xdebug, or you can download from the Xdebug Site. Once you have it installed, you need to alter your php.ini, and add some commands for xdebug. You can find this file in /etc/php, and in CentOS you want to alter /etc/php.d/15-xdebug.ini .
zend_extension=xdebug.so  //this may be different depending on install

 xdebug.remote_enable=1
 xdebug.remote_connect_back=1  //this allows xdebug to return data to the host starting the connection
 xdebug.remote_port=9000
 xdebug.idekey="netbeans-xdebug"
 xdebug.show_local_vars=0
 xdebug.output_buffering=off
 xdebug.remote_log=/var/log/xdebug.log
Before we go any further, it’s best to see how Xdebug works in a workflow.
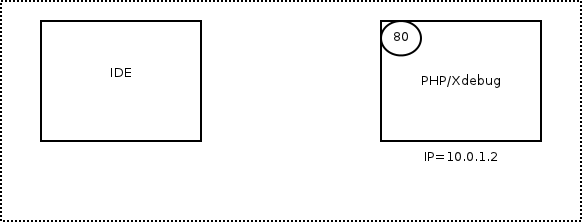
Looking at the above diagram, you can see that the Host starts a HTTP session with Apache, and then Xdebug contacts the Host with information it has gathered. It’s quite simple, but without seeing that, you may think the workflow is backwards. So now we need to test Xdebug on the Guest before we do anything more. This way we can make sure Xdebug is actually working. We can do this with the packaged binary executabledebugclient . This binary comes with everything Xdebug install, and allows you to test the connection. We can do this by starting debugclient, and visiting the site with “?XDEBUG_SESSION=netbeans-xdebug” appended to the URL (i.e. http://192.168.200.151/index.php?XDEBUG_SESSION=netbeans-xdebug). If you see anything in debugclient, you’re good to go, on to setting up the remote connection.
First we want to go to the Windows Firewall settings in the Control Panel, and chooseAdvanced Settings. From there click on Inbound Rules, and then click New Rule on the right. Choose to make a Port rule, and then on the next screen set the port to TCP, 9000. Next choose Allow This Connection, check the boxes for the networks you want the rule to work on (Private = Home), and then set the name to Xdebug. This will allow Xdebug to connect to NetBeans.
NetBeans uses settings from the project to make this connection, and doesn’t tell you this. The Project URL is the address for Xdebug, so it will only listen for that address. If you change this, make sure to restart NetBeans. If you do not, it will still use the old stale connection from the last IP used, and you will not get a connection. Last we need to go toTools > Options in NetBeans. There you just want to make sure that the port is set to 9000, and the IDE key is set to netbeans-xdebug. Once all of this is setup, you can now set some breakpoints, and choose to debug.
Xebug Troubleshooting
If Xdebug works for you, skip this section. If you are having trouble getting it to work, read on. All troubleshooting tips are discussed as if everything was setup as mentioned.
Xdebug does not connect on the guest
To test your guest, there are a few things to check. First off, check that Xdebug is in fact setup correctly. Create a new file in the root of your project directory called info.php , and add the following code:
<?php
  phpinfo();
 ?>
If in the info it shows an Xdebug section, Xdebug is working. As long as Apache is set to view the page correctly, and PHP is in fact working, which it will be if the above file outputs anything, debugclient should output Xdebug information as long as you viewed the page with http://ipaddress/info.php?XDEBUG_SESSION_START=netbeans-xdebug . If one of these things does not work, that should give you an idea of what is going on. If everything works except Xdebug, it may be a good idea to use the Xdebug Custom Install Wizard to install Xdebug with the phpinfo output from the info.php script.
Xdebug does not connect on the host
Now this is more common, but a bit easy to track down. If you are continuing to get the errorWaiting For Connection (netbeans-xdebug) , there is an easy way to track down the issue. First off, if you are using a Linux distribution, you may be using SELinux, and need to alter it’s capability before you can connect. Since the guest’s purpose is most likely only for development, I would suggest disabling SELinux, and enabling it once you get Xdebug working, and work your way backwards to get it work again. At least this way you can rule out SELinux in your troubleshooting.
Next we want to make sure that the guest can connect to the host. This is the main purpose of having the network type set to NAT in VMWare Player. Other types can cause issues, and once again, you can change it after getting a working Xdebug, and work your way backwards again to get it to work with another type. Most likely you will need to do some port forwarding on one or both systems for other setups. The guest fireware should not cause an issue if you are using a default setup. If you are blocking outbound on the guest, you need to be able to allow such. If your outbound policy is set to DENY, add the following rule if it is an iptables setup, replacing the with the corresponding IP addresses.
To test the connection to the host, start NetBeans, click the Debug Project button to start the Xdebug call, and use telnet like so:
> telnet 192.168.1.130 9000If you are able to connect, that means the guest system should be able to connect to the host with Xdebug. The only time that port is open though, is when NetBeans is waiting for a connection from the Debug Project feature.
If you can telnet to the host from the guest, but still cannot get Xdebug to connect in NetBeans, it’s time to see the state of the connection. This is something I found out the hard way, but feel it needs to be mentioned to anyone creating a remote Xdebug project. First, open a Command Window on your host ( Run > cmd ). In the new command line window, type the following:
Look for the line that has the 9000 port in it, like TCP 0.0.0.0:9000 . If at the end of that line it says “CLOSE_WAIT“, you have a stale connection still open trying to connect to whatever address. If you study that line a bit more, you may see that under the foreign address there is the IP of your Project URL. If you changed this during the setup process, it is most likely the old address. Even though NetBeans gives you a sense that the connection is reset when closing the “Waiting For Connection” state, the original connect will become stale, and override any new changes. If this is your issue, simply close NetBeans completely, and start it all again. Xdebug will now connect with the latest Project URL address.
If you still have issues, please comment below, and describe your problem. I will answer your question, as well as add any additional troubleshooting for others.
PHP 5.6 Setup on Windows
Now that the worst is over, it’s time to setup the Host side. Most may seem overwhelmed when they see the PHP download page being riddled with talk about compiling PHP with Visual Studio, but with this we won’t even touch Visual Studio once. To start, I downloaded the PHP 5.6.5 Windows VC11 x64 ZIP file for my Windows 7 x64 system. Unzip the file, and rename it the folder that was extracted to “php“. Then move the newly renamed php folder to C: . Now, we want to click the Windows Button (Start Button), and right-click Computer, and choose Properties. From there we want to choose Advanced System Settings. In newly opened System Properties window, click the Environment Variables button, and on the new window click the New button to add a new variable for your user. Add the following:
Variable Value: C:php
With that set, we can now execute PHP from a command window (cmd). We also want to setup OpenSSL support, and also see where to add other options. Go into the new php folder, and edit the php.ini-development file. In your editor, search for “php_openssl.dll”, and you will find yourself at a commented out line which you need to alter, and uncomment like so:
Once you make the change, choose to Save As.. in your editor, and save the file as php.iniin the same folder. Last, we need to setup NetBeans to have the option to use the interpreter. If we go to Tools > Options, and the PHP tab, and set the path for the PHP 5 Interpreter. Now set the option to C:phpphp.exe , then choose to Add Folder to the Global Include Path, and add C:php . With those options set, you will have a working interpreter to allow you to use things like Composer in NetBeans. How cool is that?
Composer Setup on Windows
Expanding more on those cool features, we will definitely want to install and setup Composer. If you don’t know what Composer is, or don’t know what it does, trust me you want to have it for any PHP 5 projects. Enough of that, let’s get it set up. First off, go to theComposer Site, and download the Windows Installer from the Downloads Page.
Before we start, I want to point out that everything done in the PHP Setup is needed for the Composer Installer to work. Many people have had issues with the installer, but all of the issues relate to the OpenSSL plugin not being loaded correctly, and the lack of PHP being available anywhere in the system. As long as you did everything, you should be able to run the installer without a hitch. Once you have it installed, keep in mind that needed files are inC:ProgramDataComposerSetupbin .
Now back to NetBeans. We go back to Tools > Options > PHP, and then choose theFrameworks & Tools tab. Choose Composer on the left, then set the Composer setting toC:ProgramDataComposerSetupbincomposer.bat . Lastly, set the Vendor to whatever name you want it to have, but you can only use lower-case letters, and “-” in this name. Anything else will cause Composer to error in NetBeans.
Composer Setup for Your Project
To get your rolling on using Composer on your project, let’s get it set up. This is an easy thing to do, but will allow you to get the ball rolling, and allow all of those NetBeans Composer options to work. First things first, create a new HTML5 JSON file in the root of your project, and name it composer.json . Now right click on your project name in the tree, and choose Composer > Init . This will start putting the data from the settings into the JSON file, and you are then ready to start using Composer without issue.
To learn more about how to use Composer with your existing projects, I highly suggest reading the following article on setting up Composer for namespaces, making your “include/require” line completely obsolete.
Composer Namespaces in 5 Minutes
Github Setup
Now it’s time to setup our Github repository. With your existing project on NetBeans, log into your Github account, and create a new repository, but do not initialize with a README or any other files. Now look for the link to the path of the repository that will look something like https://github.com/UserName/testproject.git . Copy the location, and save it for the steps below.
**NOTICE**Before we get started, I want to make a quick friendly reminder that if you have any files with sensitive data, like config files with usernames and passwords, that you take precautions. In good practice, change the data to placeholder values (username = username, password = password ,etc), and only add that version of the file. This allows the project to be complete for anyone helping with the project. After you have added these files to the remote repository, you can exclude them from commits. This will be covered later.
In NetBeans right click your project name in the tree view, and then select Versioning > Git> Initialize Directory. It should have your project folder on your local drive selected, and this is where the root of the Git repository will reside. Everything in that folder will be uploaded into the repository. Now we want to right click the project again, and go to Git > Remote >Clone. In the new window, paste the copied URL from the last step into the Repository URL, and fill in your username in password for Github. Keep in mind, the User/Pass field will not show until you paste the URL. After you have that set up, click Finish. The local repo is now done.
Right click your project again, click Git > Commit. This tells Git, that we are commiting the files in the project to the repository. Doing this will also initialize the master branch of the project, allowing us to start making revisions. Now right click the project again and go to Git> Remote > Push. A new window will show again, but with your remote repository information already there. Simply click Next, choose your master branch, and click Next. On the next page, you will see that for the remote option it is going to copy the local master branch to the remote origin/master branch, basically copying to the Github repository. Click Finish, and click Yes when the dialog box pops up asking if you want to set up the local master to track the remote branch. If you go back to the Github site, and look at your repository, you will see your files in the Github project! Cool, huh?
Since the first set of files have been added, if you had files that you had to remove usernames and passwords from, simply right click each file, and choose Git > Ignore >Exclude From Commit. This will make sure that any changes to those files do not get added to the repository, and you can now add your personal data back into them.
Git Basics
So now that we have our remote Github repo setup, let’s go over how to actually use it. The idea is to show each change made to each file from the beginning of project all the way through it’s development. This allows yourself as well as future contributors to easily track bugs on changes, as well as see what each file version consisted of. There is way more capability than I could ever sit and discuss, but you can find out more from the Git Site. I will simply go over the basics, so that you can use it at a very basic level.
The two main options you’ll use in NetBeans is Commit and Push. Any time you have done a revision to your project, you want to commit the changes. Basically you are saying, “I’m done changing this file, and this is what I’ve done to it”. After you Commit, you then usePush to copy it to Github, and on your Github repository, you will see when each file was last updated, as well as the date of the latest commit. You can even click on the latest commit and see what changes you made. You can commit many times, without having remote changes. It takes using Push to see those on the Github repo. If you want to play around with it more, you can see more options using the Team menu in NetBeans. The right click context menu just feels less overwhelming for new users. I myself am still fairly new to the versioning tactics, but I commit after I change each file, so that I can see what changes I made, and how they effected each version of my projects.
If anyone would like to share some simple versioning etiquette, so to speak, I’ll be happy to add it, and of course put your name next to it.
Well, that’s it. I hope that this tutorial has helped anyone create a similar setup without issue. I know that the resources for such a setup are sparse, and some NetBeans issues never even mentioned anywhere else. If you have any trouble, please comment below, and I’ll make sure to answer your questions, and add those answers to the article as well. Enjoy!
No Comments