Window to Window Communication in Electron
In Electron, it is certainly easy to create a multi-window application app in Electron, but what if you want to communicate between these windows? While we run into a restriction in the Chrome V8 Engine, that requires us to avoid remote code execution, there is a great way to accomplish window-to-window communication in Electron. We can instead create our own message passing system, with the ability to pass any data we want to any window, so it never has to change as the app grows.
Since Electron does not offer a great way to communicate between windows, we will create a system of our own. The system will allow us to communicate between all windows, by passing through the main process. Quick note: if you’re looking for a way to notify your users when Electron closes, check out Adding a Shutdown Dialog to Electron.
Before we get to window-to-window communication, we need to first setup the main process to track each window. We do this on the window’s creation, pushing the initialized BrowserWindow object into a shared array, and remove it on window close.
Creating and Tracking Electron Windows
To simplify this, we use a single function to create a window based on three given params:
- Params Object for the BrowerWindow
- Window LoadUrl Path
- Regular Expression for the Window Title
Here’s an example of that function, and using it to create the About Window. For those who want limit individual windows to a single instance, you can see it will also focus the window when it already exists:
windows.js (imported into main.js and menu.js)
const windowList = [] // shared array

function createWindow(windowOptions, windowPath, winRegex) {
  if(!windowList.filter(winItem => winItem.webContents.browserWindowOptions.title && winRegex.test(winItem.webContents.browserWindowOptions.title)).length)
{
    let win = new BrowserWindow(Object.assign(windowOptions))
    win.loadURL(windowPath)
    windowList.push(win)

    win.on('close', () => {
      // remove window when it is closed
      windowList.splice(windowList.indexOf(win), 1)
    })
  } else {
    // if window already open, focus
    windowList.filter(winItem => winItem.webContents.browserWindowOptions.title && winRegex.test(winItem.webContents.browserWindowOptions.title))[0].focus()
  }
}

const aboutPath = process.env.NODE_ENV === 'development' ? path.join('file://', process.cwd(), 'src', 'about.html') : path.join('file://', __dirname, 'about.html')

const aboutRegex = /^About MyApp$/

// example use
createWindow({
  title: 'About MyApp',
  width: 300,
  height: process.platform !== 'darwin' ? 330 : 300,
  maxHeight: 330,
  maxWidth: 300,
  minWidth: 300,
  minHeight: 300,
  frame: process.platform !== 'darwin' ? true : false,
  webPreferences: {
    devTools: process.env.NODE_ENV === 'development',
    nodeIntegration: true
  }
}, aboutPath, aboutRegex);

module.exports = {
  createWindow: createWindow
  windowList: windowList
}
Not only do we have a nice simple way to create and track our windows, but we also have a way to cleanup when we’re done. All that’s needed is to create these Windows somewhere in our electron app.
Since you can only get the current window’s ID, a big issue has been a good way to track down the ID of the destination window. To do this, we initiate lookups using the window title. This gives a solid way to identify windows, especially when the ID can change with each initialization.
Window Message Passing System
The overall concept is to create a centralized system in our Main Process which will act as a router between the windows. We do this by setting up two main process listeners. One for receiving requests, looking up the window and passing data. The second for handling responses and payloads.
The concept is quite simple, but can be a bit of a mind-bender at first glance:
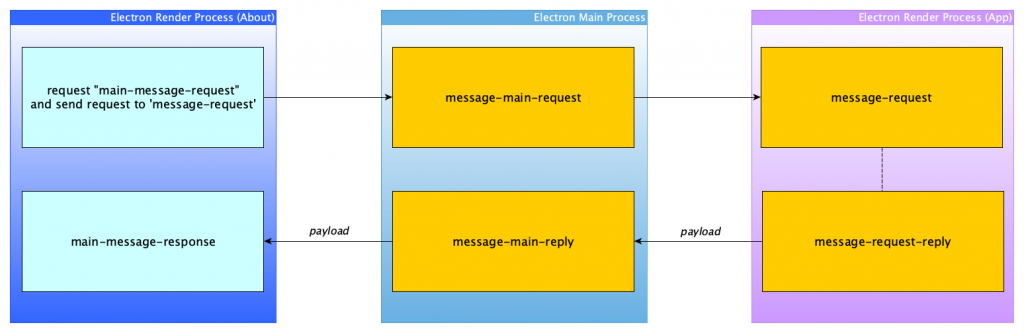
main.js
ipcMain.on('message-main-request', (event, fromWindowId, toWindowTitle, withWindowEvent, ...args) => {
  let toWindowId = windowList.filter(w => w.webContents.browserWindowOptions.title === toWindowTitle)[0].id
  let browserWindow = BrowserWindow.fromId(toWindowId)
  browserWindow.webContents.send(withWindowEvent, fromWindowId, ...args)
});

ipcMain.on('message-request-reply', (event, fromWindowId, withWindowEvent, ...args) => {
  let browserWindow = BrowserWindow.fromId(fromWindowId)
  browserWindow.webContents.send(withWindowEvent, fromWindowId, ...args)
})
With the core now setup, we can now setup a secondary window. For example an About renderer process, to request and receive state from the main renderer process.
AboutWindow.js
constructor(props) {
  super(props)

  this.current = remote.getCurrentWindow()
}

componentDidMount() {
  this.interval = setInterval(() => {
    ipcRenderer.send('message-main-request', this.current.id, 'MyApp', 'message-request')
  }, 2000)

  ipcRenderer.on('message-main-response', (event, windowId, reduxData) => this.setState({reduxState: reduxData}))
}
In the above, the component is set to send requests once the component mounts, sending a request to the message-main-request event in the Main Process, and passes the following params:
- the about window ID (remote.getCurrentWindow().id)
- the destination window’s Title (MyApp)
- the destination window’s receiving event (message-request)
The main process message-main-request listener receives the destination window’s title, and looks up the window with the matching title, then grabs the ID. Using the ID, it sends a new request using the withWindowEvent holding the event string “message-request”. It then uses the requesting window’s ID, and passes any other args from that request.
App.js
componentDidMount() {
  ipcRenderer.on('message-request', (event, fromWindowId, _type) => event.sender.send('message-request-reply', fromWindowId, 'message-main-response', this.stateUpdate()))
}

stateUpdate = () => this.props.state
On the receiving end in the Main Renderer Process, we have an IPC listener for ‘message-request’, which receives the request from the Main Process, and in this example, return the following:
- event string
- the origin ID (About Window ID)
- origin window receiving event string
- payload data (in this case the local Redux state)
Once it returns the response to the ‘message-request-reply’ listener, the Main Process Listener will start the response. It sends this to the About window’s ‘message-main-response’ IPC Listener, where the payload is passed back. Since we use the spread operator the payload can be anything, how cool!
As you can see, the system itself is fairly simple, and at the same time quite versatile. Because of the spread args you can pass whatever you want between any of your windows, without having to touch the main process listeners.
Window-to-Window Communication
With the main system done, we can now communicate between whatever renderer process listeners you want, as long as they follow the main process listener templates:
Initiating Window Request Template
ipcRenderer.send('message-main-request', <RequestingWindowId>, <DestinationWindowTitle>, <DestinationListenerEvent>, <PayloadArgs>)Receiving Window Listener Template
ipcRenderer.on(<DestinationListenerEvent>, (event, <RequestingWindowId>, _type) => event.sender.send('message-request-reply', <RequestingWindowId>, <RequestingWindowListenerEvent>, <Payload>))In this example we look at requesting data from the app process, but we can request data from the secondary windows in the same way. It doesn’t matter what window you want to get or pass data to, the format is the same.
No matter what the situation, you can now pass data between your windows, without having to duplicate state environments, and without increasing the overhead on your renderer processes.
If you are still new to Electron, be sure to check out my article on creating Fully-Featured Apps in Electron. It’s covers a lot of the common hang-ups for new-comers to Electron.
No Comments